Explore & Discover
Take a deep dive into Arsenal Image Mounter
Arsenal Image Mounter (AIM) Walkthrough
Welcome
Welcome to our first Insights article from a guest author, Shafik Punja!
Background
Arsenal Image Mounter (AIM) is one of several outstanding products developed by Arsenal Recon for digital forensics practitioners. AIM’s core purpose involves mounting the contents of disk images as if they are “real” disks on Windows. Mounting disk images this way has many benefits for digital forensics practitioners – launching virtual machines (and then bypassing the Windows authentication within them), managing BitLocker-protected volumes, mounting Volume Shadow Copies, and more.
This article will briefly summarize the features of the AIM’s Free and Professional Modes, explain the requirements for running AIM, and demonstrate how to launch virtual machines and mount Volume Shadow Copies (VSCs) from AIM-mounted disk images.
This walkthrough was built while running AIM version 3.3.134 on Windows 10 x64 version 2004 (OS Build 19041.572) and Windows 10 x64 20H2 (OS Build 19042.630). The Hunter disk image from CyberDefenders.org is used for purposes of demonstration.
Arsenal’s FAQ Page clearly explains AIM’s features, including the differences between the “Free Mode” (run without a license) and “Professional Mode” (full functionality enabled). Here is a summary of AIM features cited directly from the FAQs:
Features Overview
Free Mode
Mount raw, forensic, and virtual machine disk images as “real” disks on Windows
Temporary write support with replayable delta files for all supported disk image formats
Save “physically” mounted objects to various disk image formats
Virtually mount optical images
RAM disk creation
Command-line interface (CLI) executables
MBR injection, “fake” disk signatures, removable disk emulation, and much more
Professional Mode
Includes all Free Mode functionality plus:
Effortlessly launch (and often login to) virtual machines
Volume Shadow Copy (VSC) mounting with optional Windows NTFS driver bypass
Windows file system driver bypass support for disk image mounting
Virtually mount archives and directories
Save disk images with fully-decrypted BitLocker volumes
Disk Image Support
Raw (dd)
Advanced Forensics Format 4 (AFF4)
EnCase (E01 and Ex01) if libewf is available
Virtual Machine Disk Files (VHD, VDI, XVA, VMDK, OVA) and checkpoints (AVHD, AVHDX) if DiscUtils is available
File System Support
Many types of file systems contained within disk images can be mounted on a forensic workstation running AIM, assuming the appropriate Windows file system drivers are installed. File systems mounted by Arsenal include NTFS, FAT32, ReFS, exFAT, HFS+, UFS, and EXT3.
AIM also supports bypassing Windows file system drivers and using DiscUtils file system drivers via the “Windows file system driver bypass” mount option. File systems supported by this mount option include FAT 12/16/32 and NTFS, with experimental support for Btrfs, Ext2/3/4 (except with 64 bit header fields used by some of the latest Linux distributions), ExFAT, HFS+, SquashFs, UDF, and XFS.
AIM Requirements
Arsenal Image Mounter is designed to run (ideally) on Windows 10 (and Server 2016/2019) x64 so that all functionality (e.g. launching virtual machines and BitLocker-related functionality) works as intended. Outside of the recommended operating systems noted, most of, if not all of AIM’s core functionality is available on Windows systems only as far back as Windows 7 and Server 2012/2012 R2 x64.
Arsenal Image Mounter requires Hyper-V for launching virtual machines. If you do not have Hyper-V installed, please enable it using the directions provided in the link below:
https://docs.microsoft.com/en-us/virtualization/hyper-v-on-windows/quick-start/enable-hyper-v
Also make sure your virtualization technology setting in workstation BIOS or UEFI is enabled. It is also recommended that you exclude Arsenal Image Mounter’s folder and/or executables in your antivirus applications.
AIM Install
Once you have downloaded AIM, extract the contents of the ‘Arsenal-Image-Mounter…’ ZIP file to a folder of your choice. The contents of the AIM folder include the executable ‘ArsenalImageMounter.exe’ (GUI version), ‘aim_cli.exe’ (CLI version), and readme files for both the GUI and CLI versions of AIM.
 The readme files contain detailed descriptions on the features of AIM and usage of the product. It is strongly recommended that digital forensic practitioners review and understand the information presented in both ‘readme.txt’ and ‘readme_cli.txt’.
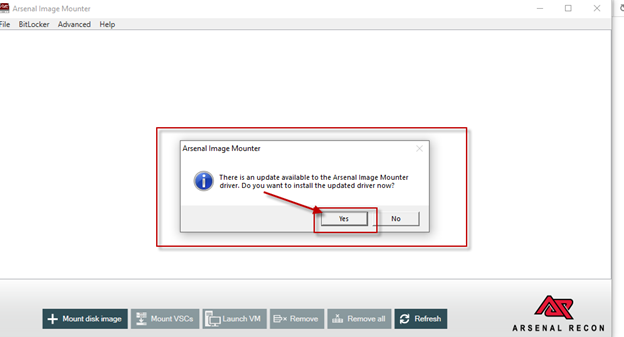
Opening AIM by double clicking ‘ArsenalImageMounter.exe’ will launch AIM and install the AIM driver. If you see the window below related to installing an updated driver, select ‘Yes’.
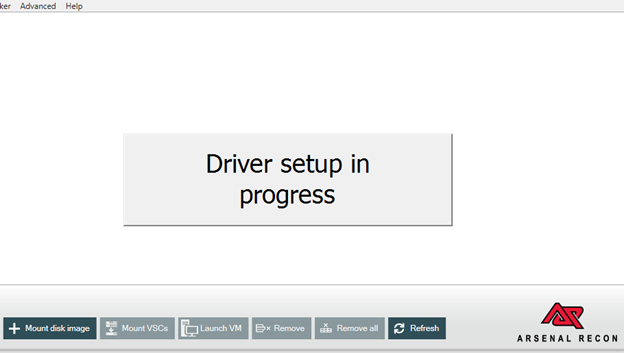
The ‘Driver setup in progress’ message window will appear.
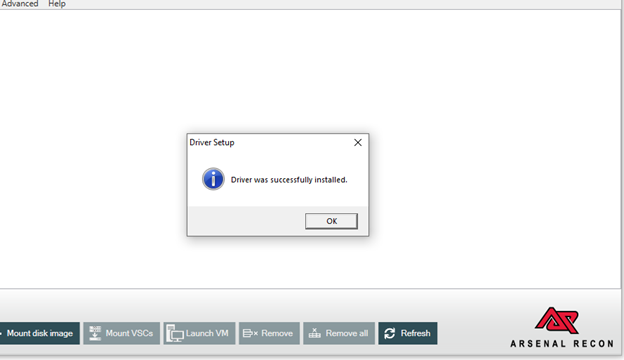
Once the driver setup has completed, a ‘Driver was successfully installed’ message window will appear.
Enabling AIM’s Professional Mode
AIM’s Professional Mode can be enabled on Internet-connected workstations by activating a license either upon AIM’s first launch or via Help -> About.
To enable AIM’s Professional Mode on air-gapped workstations, please:
Open Arsenal Image Mounter and enter the license code you were given
Upon realizing that no Internet connection is available, Arsenal Image Mounter will save a “.LIC” file to your ProgramData\ArsenalRecon folder
On a workstation with Internet access, go to our Offline Activation page at https://www.softworkz.com/offline/offline.aspx and upload the “.LIC” file.
Copy the CDM file you receive to your ProgramData\ArsenalRecon folder
Open Arsenal Image Mounter and confirm that it is now running in Professional Mode
Your air-gapped workstation is now ready to run all the Arsenal Recon tools!
Mounting a Disk Image
Let’s get the Hunter disk image mounted by AIM!
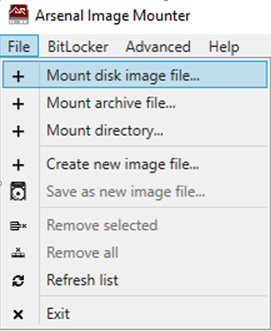
1. Start AIM by double-clicking ‘ArsenalImageMounter.exe’ and then from the File Menu select File -> Mount disk image file.
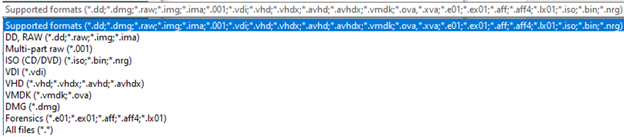
2. Select the appropriate disk image format relative to the type of disk image that you would like to AIM to mount.
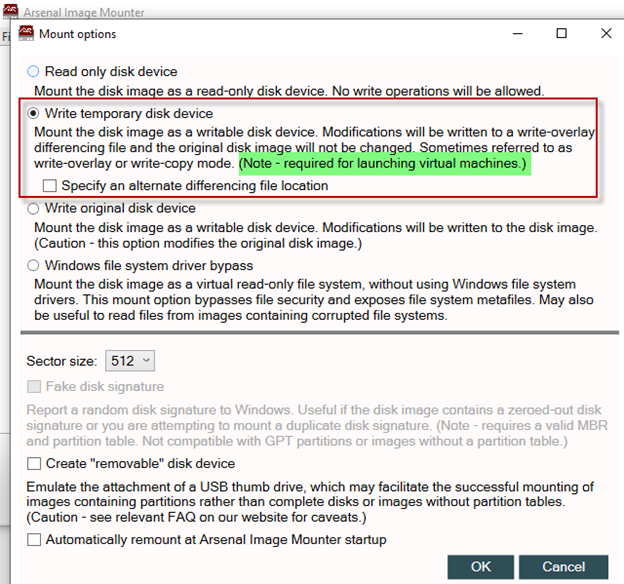
3. After selecting a disk image, the ‘Mount option’ window will appear with the ‘Read only disk device’ mount option selected. We will focus on the ‘Write temporary disk device’ mount option in this article, so we will select ‘Write temporary disk device’, and press ‘OK’. The effect of the write temporary mount option is described within the AIM mount options window.
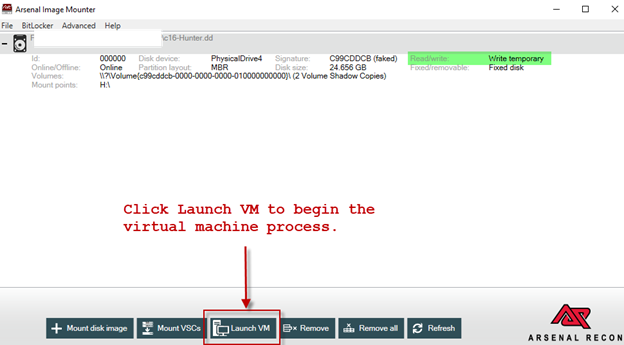
Once the disk image file is mounted, the mount points on the forensic workstation running AIM are identified in AIM’s main interface. In this case the ‘c16-Hunter.dd’ is mounted as ‘H:\’ with temporary read/write functionality. You can also see that this disk image contains two Volume Shadow Copies (VSCs).

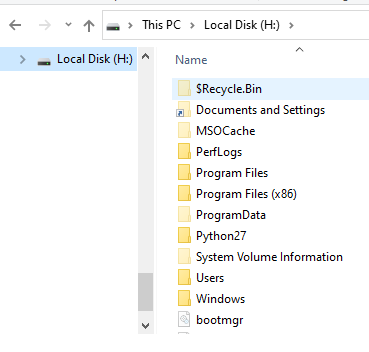
In Windows Explorer you can browse to ‘Local Disk (H:) as shown below.
The steps described above provide a quick introduction to mounting a disk image with AIM. In the next section, we will cover launching the AIM-mounted disk image into a virtual machine.
Launch a Disk Image into a Virtual Machine
This section will cover how to launch an AIM-mounted disk image into a virtual machine. Cited directly from the ‘readme.txt’ file, the next three paragraphs explain how AIM launches a disk image into a virtual machine. Launch VM – Launch a Hyper-V virtual machine using the selected AIM-mounted disk. The disk image should be mounted in write temporary mode before using this feature, which is designed to make booting the contents of a disk image in a virtual machine more efficient, reliable, and useful than other methods. AIM will determine whether the disk image should be launched as a Generation 1 or Generation 2 virtual machine – see https://docs.microsoft.com/en-us/windows-server/virtualization/hyper-v/plan/should-i-create-a-generation-1-or-2-virtual-machine-in-hyper-v for more details about the two Generations. The virtual machine is created with 2 CPUs, half of free host RAM (maximum of 4GB), two network adapters (not connected by default), one DVD-ROM (without any attached image) and the AIM-mounted disk as the primary IDE or SCSI HD. The Launch VM feature currently works (with full functionality) on Windows 8.1/10 (and Server 2012 R2/2016) x64 and requires that Hyper-V role be running on physical hardware, not within a virtual machine. Information from Microsoft about installing Hyper-V on Windows 10 is available at https://docs.microsoft.com/en-us/virtualization/hyper-v-on-windows/quick-start/enable-hyper-v. Arsenal’s preference in terms of installing Hyper-V is the “Enable Hyper-V with CMD and DISM” method. If you are unsure whether Hyper-V is running, the output from “sc query HvService” at a command prompt can be helpful.
1. Ensure you have mounted the disk image in AIM using the mount option: ‘Write temporary disk device’, as explained in the Mounting Disk Image section of this walkthrough.

2. Once the disk image has been mounted in write temporary mode, there are two ways to launch the virtual machine:
At the bottom of the main AIM interface there are a set of quick access buttons, one of which is ‘Launch VM’. Click/press ‘Launch VM’ to begin the virtual machine launching process.
Alternately from the AIM menu under ‘Advanced -> Launch in Virtual machine…’.
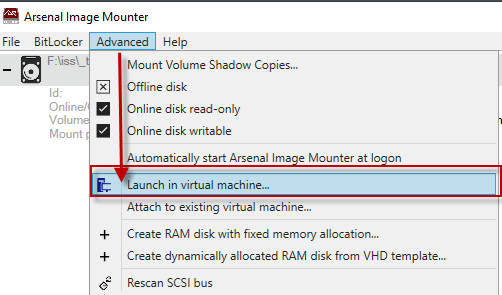
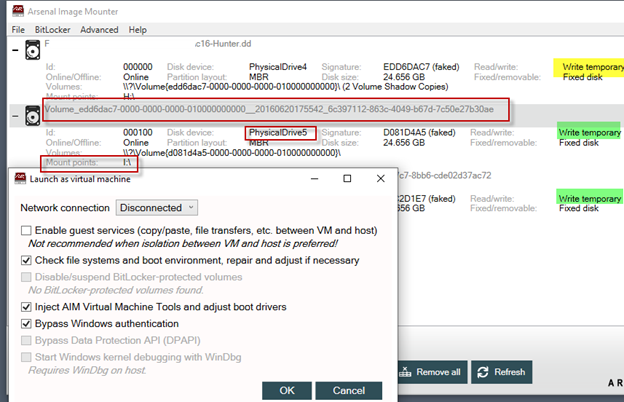
3. The ‘Launch as virtual machine’ window will appear with various default options checked (depending on the particular disk image selected), as shown in the screenshot below. Adjust the options according to your specific needs. In this case we will use the defaults.
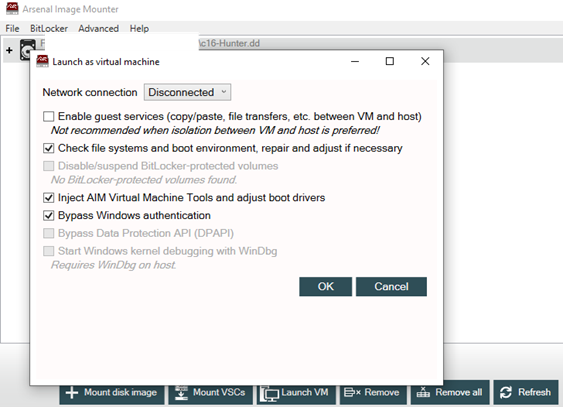
Here are the “Launch VM” options described in more detail, directly from the ‘readme.txt’ file.
Upon selecting Launch VM, AIM offers various options related to launching the virtual machine.
Configure the network connection so that it is disconnected (i.e. completely isolated), shared between VMs, shared between VMs and host, or set to the default switch with external NAT.
Enable guest services to provide copy/paste and other functionality between the VM and host. This is not recommended when isolation between the VM and host is preferred.
Check file systems and boot environment, repairing and adjusting as necessary. If this option is available (not greyed out), Arsenal recommends that you not deselect it.
Disable/suspend BitLocker-protected volumes, so that they do not need to be unlocked again once the VM is running.
Inject AIM Virtual Machine Tools and adjust boot drivers. Some disk images can be difficult to boot directly into virtual machines, so AIM can inject*1 a small application into virtual machines running Windows*2. AIM Virtual Machine Tools can display a list of accounts (accounts without tangible folder structure or without crucial Registry information are not listed in AIM Virtual Machine Tools, as there would effectively be nothing to login to and/or no way to do so) and can also open an administrative command prompt from the login screen. AIM Virtual Machine Tools will launch automatically on Windows XP and can be accessed via the “Ease of Access” icon on Windows Vista/7/8/8.1/10*3.
Bypass Windows authentication*4 using a variety of techniques, including policy adjustments, so that any password input will work. Local, Microsoft (cloud), Active Directory, and Azure Active Directory accounts, using many kinds of authentication including passwords, PINs, biometrics, images, and smart cards, are supported. Accounts will be provided with administrative privileges if requested or if the original privileges are unavailable. Please note that to access certain things in Windows like EFS-encrypted files and folders and cached login credentials you will need to crack, and not bypass, account authentication*5.
Bypass Data Protection API (DPAPI), which provides seamless access (particularly in concert with AIM’s Windows authentication bypass) to the last logged-on user’s DPAPI-protected content such as website, network share, and application credentials as well as files and folders protected by Encrypting File System (EFS). DPAPI-protected content is normally made available after a user successfully logs into Windows, but AIM’s DPAPI bypass makes it available without having the user’s credentials. This option will be available in certain situations when AIM first launches a Windows 10 x64 system with local or Microsoft (cloud) accounts into a virtual machine. Please note, this option currently works best with single-user systems and will not persist across reboots.
Start Windows kernel debugging with WinDbg.
AIM will perform anti-virus evasion within the virtual machine to ensure that AIM Virtual Machine Tools runs properly.
A file named “AIM_MODIFIED.txt” will be placed on the root of each Windows volume in which AIM Virtual Machine Tools has made adjustments. These adjustments are temporary by design, based on “Write temporary…” mounting.
Depending on your anti-virus software and settings, you may need to exclude/whitelist AIM’s folder and/or executables (ArsenalImageMounter.exe and aim_cli.exe) and/or temporarily disable real-time protection to ensure that AIM Virtual Machine Tools will be injected properly. You may also need to instruct your anti-virus software to ignore/allow the “utilman.exe” threat while the VM is booting.
It is not always possible to identify an authoritative DOMAIN\USER combination for cached domain accounts in certain states, so AIM may create a DOMAIN\USER combination to facilitate access to those accounts. AIM Virtual Machine Tools will display AIM-created DOMAIN\USER combinations in red.
In the case of Active Directory accounts, if a domain controller is available it is quite easy to set up a virtual network between it and the clients (all running in virtual machines launched by AIM), which will allow you to reset account passwords from the domain controller. Resetting passwords in this way will allow you access to previously inaccessible items on the clients such as cached login credentials and EFS-encrypted files and folders.
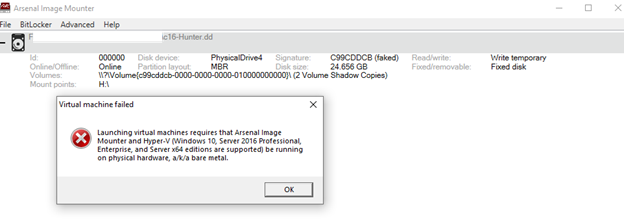
Launch virtual machine failed message
If you see the error message ‘Virtual machine failed’, it is likely you either do not have Hyper-V installed or it is not running properly. If Hyper-V is not installed, remove any disk images currently mounted in AIM, close AIM, and then install Hyper-V. After Hyper-V is successfully installed repeat the previous steps to mount the disk image in write-temporary mode and then launch the virtual machine.
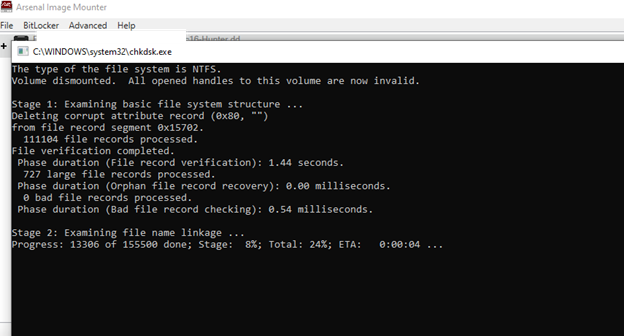
4. After continuing past the ‘Launch as virtual machine’ window, several windows will appear during the virtual machine preparation.
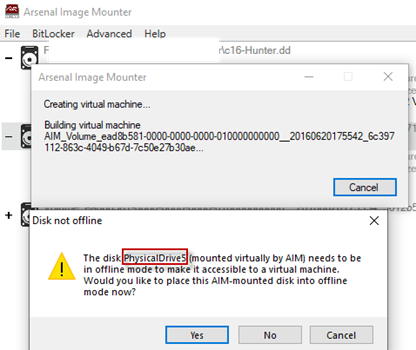
• If AIM determines that file system repair is necessary, a command prompt window will appear. No interaction is required from you during this stage.
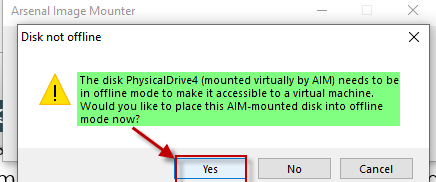
 After the command prompt window goes away, a ‘Disk not offline’ message window will appear. Select ‘Yes’. The disk must be placed into offline mode in order to use it with a virtual machine.
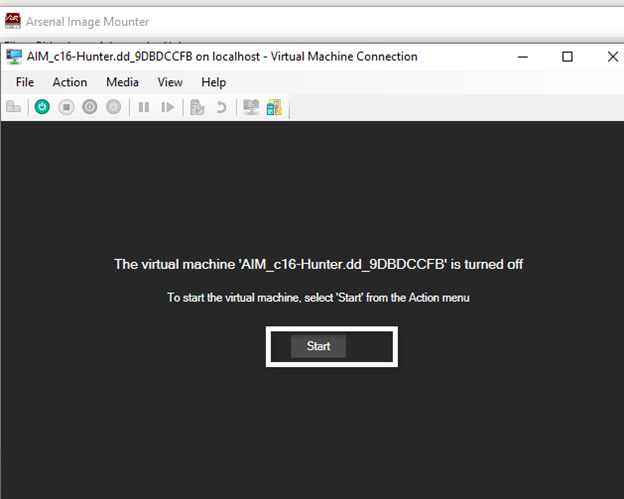
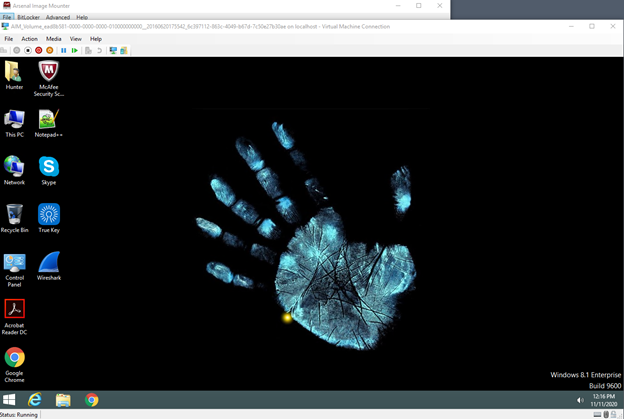
 5. Once the disk is placed offline, a Virtual Machine Connection window will appear. The virtual machine can now be started by clicking on ‘Start’.
 Once started, the virtual machine begins to boot into Windows (or another operating system, depending on the operating system(s) contained in the disk image you have mounted).

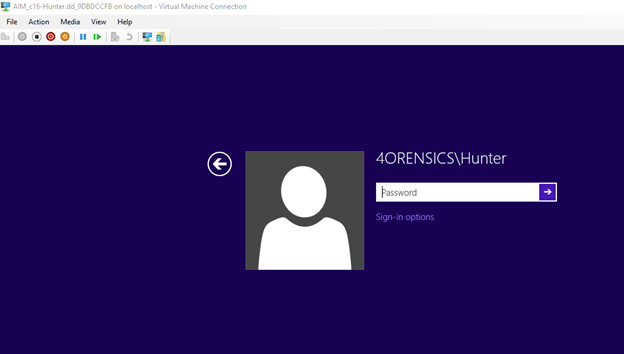
6. We have launched a virtual machine and are now at a Windows login screen that appears to require a password for the user ‘Hunter’. You may not know the password to this account.
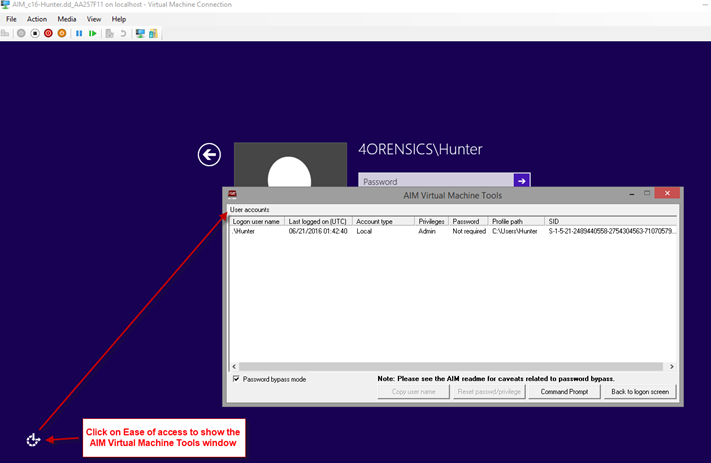
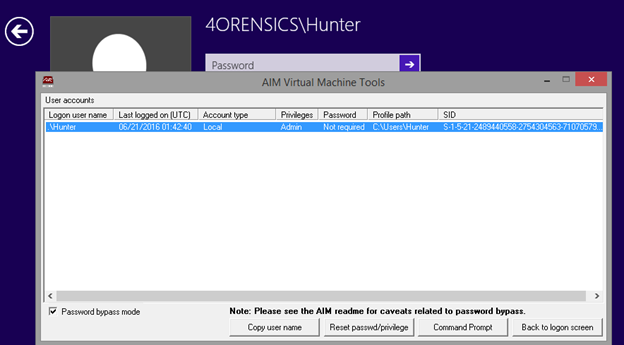
 7. Before attempting to login to the default user account, let’s first check to see how many user accounts (and what types!) are present in the Hunter disk image. This can be accomplished by selecting the ‘Ease of access’ icon, at the Windows logon screen, in order to display the AIM Virtual Machine Tools window. There is one user account identified, with a ‘Last logged on’ date and time in UTC, account type, user account profile path, and Windows SID value. The default options within the AIM Virtual Machine Tools window are shown in the screenshot below. Note that two radio buttons at the bottom of the AIM Virtual Machine Tools window are greyed out.
 8. If you select the row that shows the user account information, this will activate the previously greyed out buttons, as per the screenshot below. Now that we have identified the user account(s) using AIM Virtual Machine Tools, we can click on ‘Back to logon screen’ or close the window by hitting ‘X’ in the upper right hand corner.
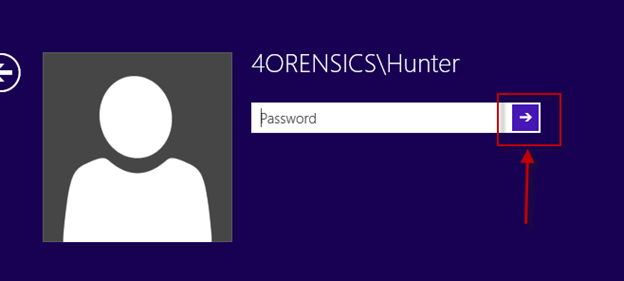
 9. With AIM’s ‘Bypass Windows authentication’ (if this option was left checked earlier), you do not need to know the password to the user account. Click on the right facing arrow in the Password field or press ‘Enter’ on your keyboard.
 The next two screenshots demonstrate the Windows authentication being bypassed and then accessing the user’s Desktop.
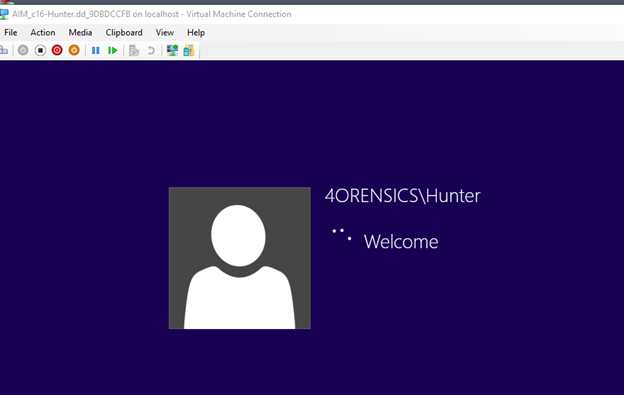
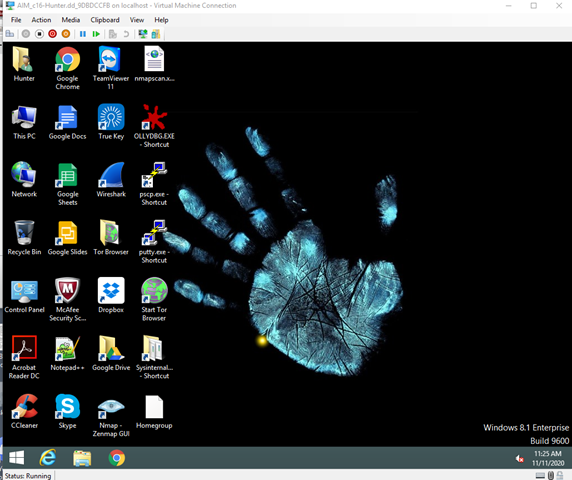 The operating system can now be viewed from the perspective of a user.
A digital forensics practitioner could run third-party tools within the virtual machine by enabling guest services, which will allow file transfers between the VM and host or using other methods such as attaching a disk to the virtual machine or leveraging PowerShell Direct. See the AIM readme for more details about these options.
 We will demonstrate mounting VSC’s (from an AIM-mounted disk image) next.
Mounting Volume Shadow Copies (VSCs)
Volume Shadow Copies (VSCs) can be especially useful to digital forensics practitioners. They may contain valuable data that existed in previous versions of the file system that no longer resides in the current file system.
1. We will first mount the Hunter disk image in write-temporary mode.
2. After the disk image has been mounted, we go to ‘Advanced->Mount Volume Shadow Copies…’.
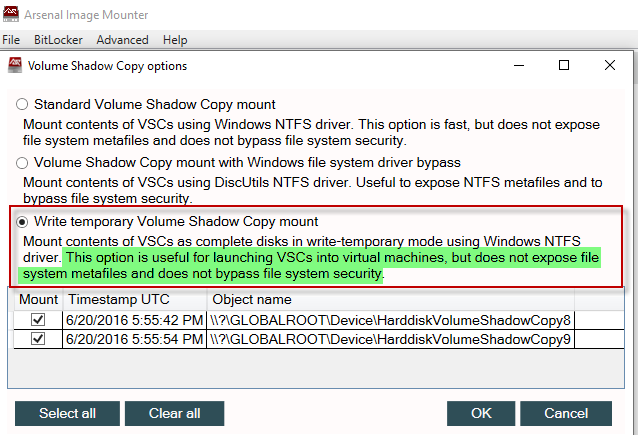
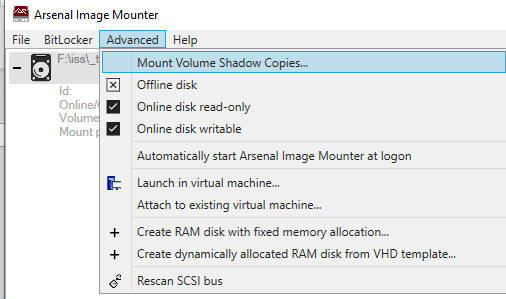 3. This will open the Volume Shadow Copy options window. By default, ‘Standard Volume Shadow Copy mount’ and all the VSCs are selected. Carefully read the description of each option to ensure Volume Shadow Copies are mounted the way you expect.
4. AIM will request a folder where the VSCs should be mounted, regardless of whether one or more VSCs are selected. In the ‘Browse For Folder’ window, identify where you want to VSCs to be mounted and press OK.
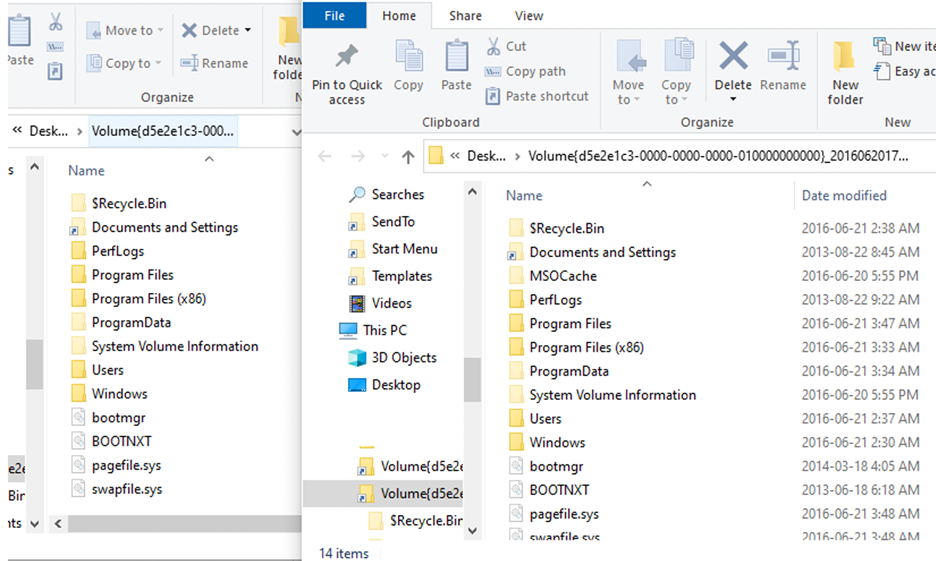
5. In this case both VSCs within the Hunter disk image were chosen and the location selected for mounting them is the Desktop. The VSCs can now be browsed as a series of folders, and third-party tools can be utilized to analyze or image the mounted VSCs.
6. Choosing the ‘Standard Volume Shadow copy mount’ will mount the VSCs quickly, but will not expose the Windows file system metafiles (e.g. $MFT, $LogFile, $UsnJrnl etc.) and will not bypass file system security. This is demonstrated in the screenshot shown below, showing no presence of NTFS metafiles in both VSCs.
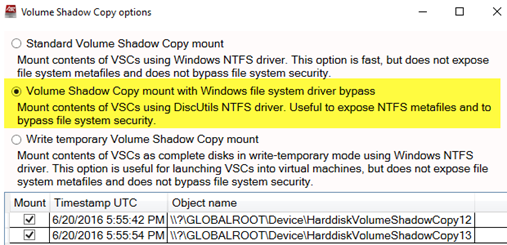
 7. If you want to access the NTFS metafiles for analysis and imaging, select the option ‘Volume Shadow Copy mount with Windows file system driver bypass’. With this option the VSCs are mounted with the DiscUtils NTFS driver (rather than the Windows NTFS driver) and NTFS metafiles are exposed. Remember that AIM will prompt for a folder location for mounting the VSCs.
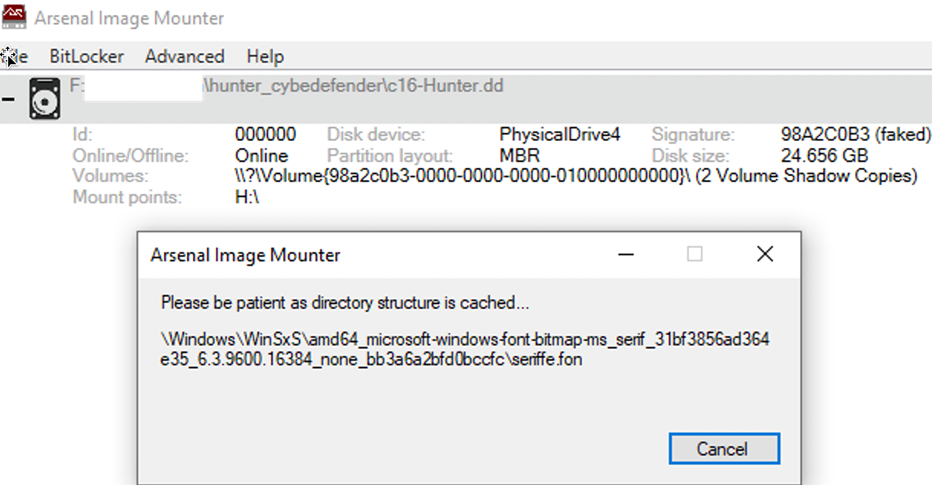
 The ‘Volume Shadow Copy mount with Windows file system driver bypass’ option will cause AIM to begin the process of caching the directory structure. This is not as fast as the ‘Standard Volume Shadow copy mount’. You will see that AIM is quite busy while the directory structure is being cached.
 9. If you decide to use the ‘Write temporary Volume Shadow Copy mount’ option, the VSCs will be mounted as if they are each a “real” disk and their mount points will be clearly identified.
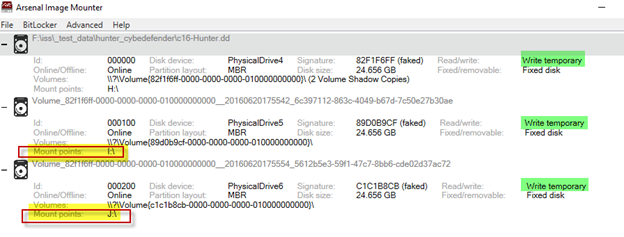 The mounted VSCs will appear in Windows Explorer, in this case as drive letters ‘I’ and ‘J’. These VSCs mounted can be physically or logically imaged using the imaging tool of your choice… or even launched into virtual machines, which we will discuss soon.
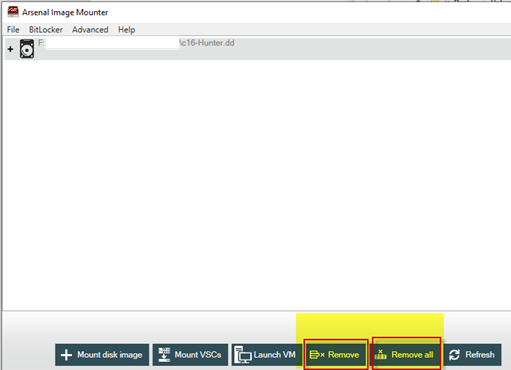
10. Mounted VSCs can be removed by highlighting the relevant AIM-mounted disk image and choosing ‘Remove’ or by choosing ‘Remove all’.
 This concludes a brief review of the VSC mounting options. In the next section, we will demonstrate launching a VSC from an AIM-mounted disk image into a virtual machine.
Launch a Volume Shadow Copy (VSC) as a Virtual Machine
This section will cover how to launch a VSC from an AIM-mounted disk image as a virtual machine. Steps we have covered in the Mounting Disk Image and Mounting Volume Shadow Copy sections of this walkthrough are relevant.
1. First, we mount the Hunter disk image in write-temporary mode.

2. Next, we mount the VSCs with the Volume Shadow Copy option ‘Write temporary Volume Shadow Copy mount’.
 3. In the AIM interface, remember to first select the VSC you want to launch as a virtual machine and then use the ‘Launch VM’ function. In the ‘Launch as a virtual machine’ window accept the checked defaults and select OK.
Disk image mount option: Write temporary
4. The mounted VSC is placed offline for the purposes of launching a VM.
5. The VSC is now launched into a virtual machine and we have accessed the user’s Desktop by using AIM’s Windows authentication bypass.
AIM Use Cases
As mentioned at the start of this article, the goal here has been to provide a walkthrough of some popular AIM features. It would be difficult to cover every option or combination of options that could be used, and this article would have been much longer! This section will cover various use cases for AIM. These use cases are by no means exhaustive, but they are designed to give you some ideas about how you can apply AIM in your own casework.
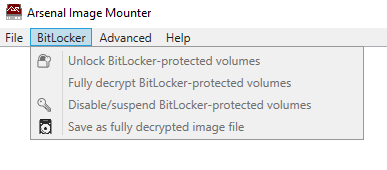
BitLocker Management
AIM’s BitLocker menu (Professional Mode) allows a digital forensics practitioner to unlock a BitLocker-protected volume, suspend a BitLocker-protected volume, disable (fully decrypt) a BitLocker-protected volume, and fully decrypt a BitLocker-protected volume and then save out a fully decrypted disk image… so that image can be easily used in other (commercial or open source) digital forensics tools.
Launching Virtual Machines to Unlock or Remove Full Disk Encryption
AIM can be used to launch disk images containing various kinds of full disk encryption (especially those that are unsupported by popular digital forensics tools) into virtual machines, allowing you to interact with the full disk encryption’s “pre-boot environment” – in other words, a small operating system used by the full disk encryption that runs before the main operating system. Depending on the type of full disk encryption, you may then have options which include unlocking and removing the full disk encryption as well as various key recovery methods.
Triage
Using AIM’s Launch VM feature (Professional Mode), an investigator or a digital forensics practitioner can view an operating system from the perspective of a user. Using a forensic workstation, an investigator or a digital forensics practitioner could triage a disk image and identify if any “low hanging fruit” is present. The challenge to this approach is the inability, for example, to readily view deleted artifacts and NTFS metafiles. This approach should be balanced with the use of digital forensics analysis tools that allow for a more comprehensive view of the file system.
The intent behind the triage use case is to assist agencies or companies with addressing large case backlogs by allowing investigators to assist in case review. This is not necessarily the best solution to case backlogs but is rather one idea worth considering. Humbly stated, there is no single solution to growing case backlogs.
Live System Analysis
The ability to launch AIM-mounted disk images or VSC’s into virtual machines (Professional Mode) is beneficial for examining a live system. Monitoring process, file system, and network activity on a live system can be incredibly valuable, particularly in cases involving malware.
Accessing DPAPI Protected Content Without User Credentials
What is DPAPI (Data Protection API) protected content? From another Insights article:
“Microsoft released DPAPI in Windows 2000 so that third-party developers (and Microsoft themselves) would have a reliable, flexible, and easy-to-use method to encrypt and decrypt data. DPAPI encryption can be based either on a particular user (requiring the use of the user’s Windows login credentials) or a particular system (requiring the use of any user’s Windows login credentials). DPAPI-protected data can be found in many places on a Windows computer such as the Registry and various application databases. In some situations it’s easy for a digital forensics practitioner to determine how applications are using DPAPI-protected data, but in other situations (e.g. Dropbox databases) it’s more challenging, because DPAPI is part of a larger system to protect a particular type of data.”
Now that you know how valuable DPAPI-protected content is, you also know how valuable accessing that content without user credentials can be. Check out the aforementioned Insights article to learn more about AIM’s DPAPI bypass.
Non-Windows Disk Images Launched as Virtual Machines
If you recall earlier in this walkthrough you read about support for mounting several non-Windows based file systems. AIM is not limited to launching Windows into virtual machines, but can launch operating systems like Linux into virtual machines as well. This could be quite useful if you are dealing with a suspect running Linux or perhaps a device running embedded Linux like some DVRs.
Final Thoughts
Hopefully if you have made it this far in this walkthrough, you have acquired a clear and useful understanding of some significant AIM capabilities. We encourage you to consider Arsenal’s formal AIM online training and certification (being released January 2021) if you would like to increase your mastery of AIM in your casework.
Sources/References
The Hunter disk image is available at https://cyberdefenders.org/labs/32.
You can read about how digital forensics practitioners have used AIM on Arsenal’s Testimonials page.
You can view some AIM training videos on the Vimeo Arsenal Image Mounter channel at https://vimeo.com/channels/1544872/videos.
Acknowledgements
This walkthrough would not have been possible without a team effort involving Shafik Punja with support from Arsenal’s Mark Spencer, Emina Doherty, and Anastasia Shek. We would like to thank you for reading this article, and hope you send us feedback so we can refine it.